Exploring the many uses of patterns for other craft projects.
User avatar
By Bonster
#9993
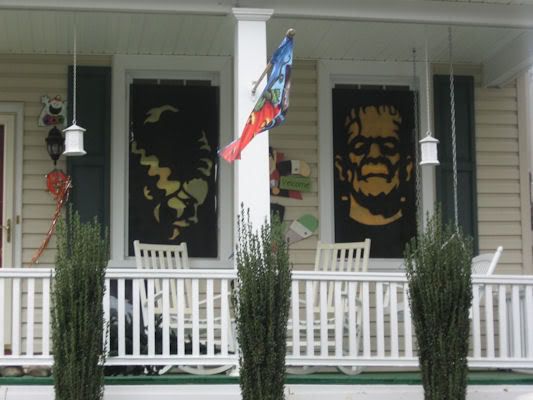
Your window covers look incredible! Oh how I wish I didn't live in an apartment!!!!

I don't know how you did your cutting, but have you considered using a rotary-style cutter? I've seen these in the quilting section of sewing supply stores like Fabricland and Bou-Clair. I know they make them in small and large diameters - and I believe I've even seen one that looks a bit like an ulu knife that would give you awesome control on the corners.
User avatar
By St0ney
#11732
Those are VERY Cool !


I did two last year and their 6' tall, sorry can't find the night shots.
but heres a day shot I found.

These were made from 1/4" plywood, and cut out with a jigsaw.
with Tissue paper taped on the backs.

Image
User avatar
By Tkaraoke
#11743
Holy crap! Those look stunning. St0ney! You have to find the night pictures if you can. Did you use color tissue paper?
User avatar
By St0ney
#11746
Tkaraoke:

I'll look again - but Last year I had a hard drive crash, and think they were on it?

I'll check my photobucket account, maybe one's on there?

Yes on the Colored Tissue Paper.

And I did leave out that I Painted them Black.
- I know DUH ! - LOL
(they were painted "After" Cutting the pattern out)
User avatar
By Tkaraoke
#11760
This is going to sound like a dumb question but how did you resize the pattern that large to fit on the plywood?
User avatar
By sodajazz
#11761
He didn't resize the patterns, he actually owns a gigantic industrial printer which prints out 6ft prints in less than 3 mins.

I however am not as rich as st0ney and do not have the room to house such a printer, so if I undertake projects similar to that I have to rely on the poster settings on my lowly average size printer :lol:
By GUS
#11762
(AHEM) ...projector

my foray back in the 80's into t-shirt painting often took pics (as small as the size of a stamp & was able to blow up a picture to around 30ft (bit large for a t-shirt I know)!

grab the type whereby you lay your picture (it gets hot due to the 300 watt bulb & fan) flat on the top & the mirror lense does the rest..
(schools normally have that type or at least an overhead projector which is grainier in it's image projection)

I used to do planting stencils & all sorts for flower-beds as a sideline (though not hip for a 17 yr old! :roll: )
User avatar
By Drayco
#11764
Actually there are a couple of programs you can download to print poster size pics on your home printer if it doesn't already come with it. St0ney offers one for free in his "members-extra's" section. You can also find them on the net. I used Rasterbator once, not the best but it was ok. You enter the size and it tells you how many sheets of papers it will take to print it. Assemble the pages (tape or glue) and start carving/cutting.
User avatar
By St0ney
#11765
Yepper !

Drayco's correct I use a Poster Proggie.

You tell the program how large you want the poster, and it spits out a dozen or so sheets. you then tape all the sheets together.

And Tape the top of the entire Poster to the plywood.

Then just use a sheet of transfer paper to trace it on.
(you only need (1) sheet of trancing paper, you Move it around under the poster, as you go.

FYI: the reason I went with the plywood, was I was having a hard time with using felt, there was tooooo much sagging.

Some folks also use black poster board.

Another reason I went with the ply-wood is All my windows have panes - so the windowkins needed t be placed outside of the windows. posterboard would not holdup in the weather.

Besides it's a fun wood working/pumpkin project.
User avatar
By Zombie Pumpkins!
#11767
Excellent work, St0ney. Huge and sturdy windowkins. Does the colored tissue paper hold up okay, if these are placed on the outside of the windows?
User avatar
By Tkaraoke
#11768
That's spiffy! I better download that puppy before my membership expires this year! :D

Looks like I'm going to be moving sometime in the next month or so and Im not exactly sure if I'm going to be able to have a pumpkin display. At least I can do something cool with stencils like these projects.
By GUS
#11772
Wheres better than Missery ? ..and how many kins fit in a typical U-haul?
User avatar
By St0ney
#11773
Thanks Ryan,

The Tissue paper worked out great.
It did rain a few days and they held up.

I had them up for about two weeks total.
And did tape the tissue paper on the back with 3 in shipping tape.
lots of tape !!

My only regret - was snif snif , :cry:
not to use green tissue paper on Franky .
FORGIVE ME ! - LOL

But hey their made out of wood, Green it is come Oct 08.

I'm looking to do a few more this year. (over the summer).
So many windows - so little time.
User avatar
By St0ney
#11774
GUS wrote:(AHEM) ...projector
grab the type whereby you lay your picture (it gets hot due to the 300 watt bulb & fan) flat on the top & the mirror lense does the rest..
(schools normally have that type or at least an overhead projector which is grainier in it's image projection)

An "Opaque Projector".
I used these also in the past. when in High School & Art School.
I once did a blow up of Elvis and Marylin Monroe for a school play.
each were blown up to 15'. and painted on 3/4" thick plywood.

the biggest problem could be if the projector gets one little nudge - your um screwed. :lol:
will take a lot of time to re-align it to what you have drawn/traced already.

For the window-kins you cant go wrong with a fairly good poster program.

The transfer paper just speeds up the process.
One could print out the poster, then cut out the cut-out sections of the pattern with an exacto knife, then trace inside those cut -out areas. (the transfer paper idea is much easier though).
User avatar
By KILLER KLOWN
#12869
What a great idea, using plywood. You could also cover the back with really thin plexi, and paint the plexi any color you want. That would show the light through and still hold up to the elements.

I own an opaque projector. That's the way to go!
Image