Trading tips for gutting, transferring, and carving the real thing.
User avatar
By St0ney
#27034
Hey Guys I wanted to share this with the carvers, that Carve a bunch of pumpkins each year, and have to do a lot of carving in just a few days.

Over the past week or so, I was experimenting with different products, to spray over the transfer after using the Saral Transfer paper, I wanted to lock on the Pattern, Where it could be transferred and sprayed, then carved days or weeks later.

Sure you could use a ballpoint pen and go over the lines.
But that's tracing it twice, And knew there had to be a better way,


I tried Many different things - And found the thing that does work.
And it Works Really Well, After the Stuff Dries, You can Take a Wet towel or sponge and Rub Hard, and the Pattern Stays Put on the Kin.


Here's What You Do: First when you Get your piece of transfer Paper from the Roll.
To help avoid smudging, wipe the Saral Transfer Paper lightly with a tissue to remove any excess coating or dust.

Then Tape the transfer Paper to the kin.
Tape Pattern over transfer paper, Then Trace Pattern. - LOL
After you remove the Pattern/Transfer Paper.................

Spray it with Dick Blick "Matte Fixative" ($5.24 a Can)


Image


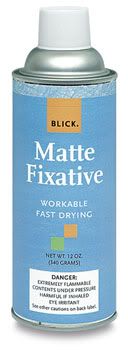
You Hold it 12 inches away and Put a light coat on it.
It Dries in just a few minutes. After it Dries your pattern is there to stay.

I only tested this on Blue Saral Transfer Paper, And it worked Like a Charm.

I added the Fixative to the Stoneykins Store.
Make sure you get the MATTE Finish Not the Gloss.

Unless of course you want a really Shiny Pumpkin get the gloss.

Now if For Some Reason, you change your mind on the design that you locked on the Kin, The next Post will tell you how to remove the Fixative and Stencil .
Quick and Simple.


I will emphasize that if Anyone makes a mistake with the Transfer.
Messed up Lines, To Much Smudging etc....
Please Use Common Sense and Don't Seal the transfer on with the Fixative.

Use a Wet Paper Towel, remove stencil, And Do OVER!
Last edited by St0ney on Sat Sep 26, 2009 11:02 am, edited 6 times in total.
User avatar
By St0ney
#27036
Removal : of Fixative and Stencil

Okay because of my Last Post I decided to Run some test on removal.

Here are my Findings:

A) The Matte Fixative - WORKS !

For Removal :

a) Clear Alcohol - Worked But Had to Scrub Hard.
b) Nail Polish Remover - Same as Alcohol - Scrub Hard.
c) Klean Strip - Brush Cleaner - This is what took it off Very Easy.

You can buy this at Home Depot or Lowes.

Also This Stuff has a HUGE Kick to it (Smell)
So you'll want to do this outside.

Image

I'm sure other things would work, But I'm only testing with Stuff I already have in the house.
By JMP919
#27039
Thanks for the tip St0ney. I was actually just wondering last night what to do in that very case. Very helpful tip
User avatar
By St0ney
#27048
Your Very Welcome !

This tip will help many carvers.

I just got confirmation (struck a deal) With Linvilla Orchards.

I have carved there the past two years.

The biggest Issue, was transferring the pattern, takes almost as much time as doing the actual carving.

So with this new thing (above).

I can now pop over there, Pick up 15 to 20 kins.
Take them Home, Transfer the patterns during the Week, Seal them on the kins.


And when I go there Sat & Sunday to Carve
I can just concentrate on carving.


I will do some transfers there, For I'm into Showing people How to carve, (besides Slinging my site and services). :D
User avatar
By St0ney
#27056
Nightwatchman wrote:Thanks for the tip St0ney, this is a great idea. How well will the pattern stay in the pumpkin if you transfer the pattern before you gut the pumpkin.
Gotta Be honest: I only transferred the pattern, sprayed it,

then tried different ways to remove it - in case it had to be removed.

So I did not Carve the Kin.

BUT! Like I said, After this Stuff Dried, I got a Very Wet Paper Towel.
And Scrubbed Hard, And the Stencil did not Smudge or Come off AT ALL. So I'm Guessing the Pumpkin Juice will not take it Off.
The Juice is mostly made up of water.

I'm picking up some, Actually LOTS - LOL
of Pumpkins on Monday - and will carve them this Sat.

So I can Give a Confirmation then.


I did'nt carve the one I tested for it's a nice 40 ponder that I got for 8 bucks, So want to save it for the home display.
User avatar
By St0ney
#27059
Nightwatchman wrote:Thanks for the tip St0ney, this is a great idea. How well will the pattern stay in the pumpkin if you transfer the pattern before you gut the pumpkin.

Nightwatchman:

Sorry I misread your post - I'm dead Tired, I spent the Last 3 days Printing 100's of patterns, And putting Some props together for the farm thing....


The Whole Reason for this is what you just typed.

So you can transfer the pattern - On a Un-gutted kin.
And Seal the pattern on for Later Gutting/Carvings.

Like I typed above - I'm transferring the patterns on about 20 kins.
Spraying over them with the Fixative,


Then almost a week later, they will be gutted and carved.
User avatar
By St0ney
#27060
Also want to add one last thing. (before I scoot)

I did this - to use on REAL Kins..
For Foam - I glue on the pattern.

But I'm sure for those that use transfer paper for foam carving.
This will also work on those too.

Have Fun !!
User avatar
By Zombie Pumpkins!
#27061
Thanks for the tip, Stoney. Just a quick note to the casual carvers who may be skimming this thread quickly... don't feel that you need to spray fixative and brush cleaning fluid into your routine, if you're just carving a few pumpkins like the average joe.

What I love about this transfer paper is that is stays put (generally it doesn't smudge just by touching it, you'd have to get it wet).

And what people have told me is that they also like that it wipes off with a wet paper towel, which is nice if you've left some lines behind after carving and want to clean up the look of it. If you seal in your transfer lines with fixative, you may want to make sure you cut away all those transfer lines for the cleanest look.

That said, if you're the type that carves a LOT of pumpkins (and I know some of you are) it makes sense to transfer your patterns way ahead of time. Which means, you shouldn't gut them yet. Which means, the surface is likely to get wet during the messier gutting process. So for that reason, sealing in the transfer lines sounds like a smart idea.

Indeed, try the matte finish spray, not the gloss, if you want your pumpkins to look more natural, and not shiny. They will probably photograph better too, without the worry of getting glare bouncing off the pumpkin skin.
User avatar
By SuperSonic
#27069
heres my way for those who do not want to use this method and has worked for me for YEARS if you leave it in the cold and want to carve it JUST after you take it out of the cold

1. clean your pumpkin of all the condensation from bringing it from a cold-to-warm environment
2. as your gutting keep cleaning
3.same apllies from step one as your taping
4.transfer your pattern and happy carving :)
User avatar
By SaneInsideInsanity
#27101
Thanks for the tips Stoney and Ryan, I normally transfer all mine during the week and then spend a day or too carving ive never used seral paper though i cant find it here...yes i know i can buy some from the shop now. I always used plain transfer paper but the problem with that is on realkins the lines are so faint so then i would trace them again and spray them with hairspray which helped keep the lies fairly well but not quite well enough near the end
User avatar
By St0ney
#27633
OogieBoogie wrote:I cant wait to try this! Thank you Stoney!
Your Welcome :wink:

Tonight I'm starting to transfer Patterns, I start carving this Sat and Sun At Linvilla Orchards.

As Stated, By me on the very first line, of this thread, This tip is for those who carve Many Many Pumpkins, this tip will help you tremendously, this way all your doing on the carving days is carving.

As Ryan Stated - if you only carve a few don't bother with spraying the stencil, But You as the carver can determine what a lot means to you 8, 15, 20, 100 etc....

How I'm going to work this is, I'm Pre-transferring the shaded patterns only, I will transfer the cut-outs on-site and in front of people, so they can see the entire carving process (from start to finish).


So getting the patterns on these - And have the pattern last with-out smudging off, will be a great Help.


Here's what my yard looks like as of today.
This is about 20% of what I will be carving. in the coming weeks

Image
User avatar
By nosferatu
#27646
20%.????

I doubt I've carved half the amount you have there in my entire life!
User avatar
By St0ney
#27654
nosferatu wrote:20%.????

I doubt I've carved half the amount you have there in my entire life!
Yep - Most likely around 150 to 200.

This year I'm allowed to setup a 3 sided tent.

I pitched a fit the last two years, As you all know these only look good in the dark, and by the time it got dark, the crowd thinned out.

I have Some pretty Cool Idea's for this year..
(lots of themes).
And will be posting a Lot of zombie Carves, and Sending him some traffic. My Hands Already Hurt just thinking about all the carving.

Sorry to switch topics, But what's Cool about the tent is it has a back window, I'll add (hang) a few windowkins in front of it.